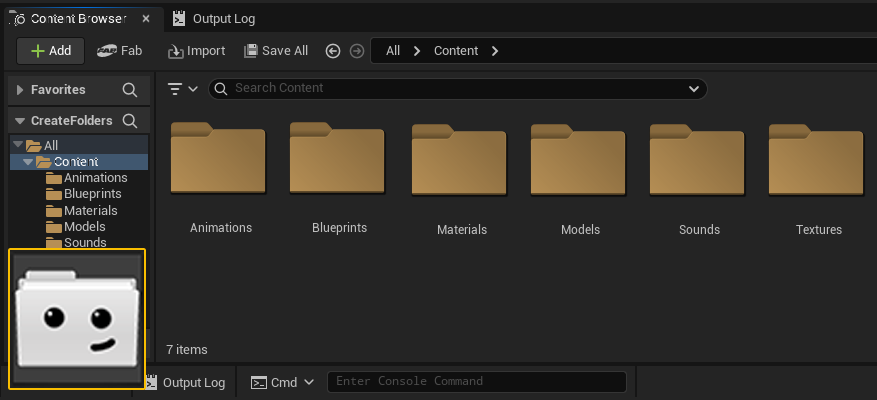
Ever wondered how to go about creating new functionality using Unreal Engine and C++ ? This tutorial guide aims to cover the very basics of getting started and in particular using a toolbar button to run some custom functionality.
It will display a button and when pressed will prompt the user. Depending on the users selection, the plugin will either cancel cleanly or create the specified folder structure at the root of the project.
Requirements
The minimum supported version of Visual Studio for UE 5.2. Compiling with Visual Studio 2019 ensures that the resulting libraries are compatible with UE 5.2 for all users. For more information about Visual Studio and Unreal Engine version compatibility, see Setting Up Visual Studio for more information or https://dev.epicgames.com/documentation/en-us/unreal-engine/plugins-in-unreal-engine for a similar setup guide. See the Unreal C++ API reference also: https://dev.epicgames.com/documentation/en-us/unreal-engine/API
Step 1
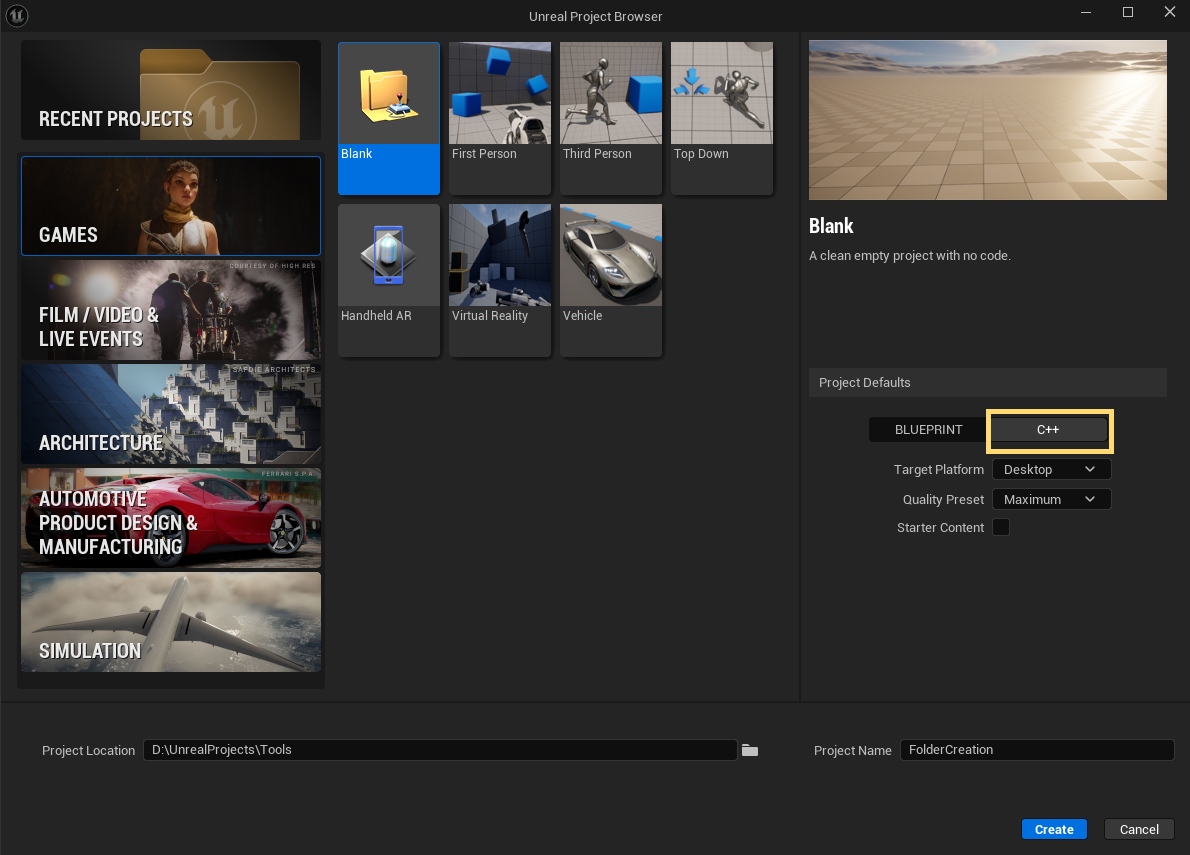
Open Unreal Engine and create a new project. Select blank and make sure to select C++ under the Project Defaults panel. As you will see, when Unreal opens, Visual Studio will also open.
Step 2
Once the Unreal Engine editor has opened, you will notice a gear icon with Settings on the top right (if using the default layout). Press this to expand the drop down and click on Plugins.

Step 3
When the plugins panel opens, press the +Add button to open a wizard that will help us create any number of specific plugin types. There is another way via creating new classes, but for this tutorial, we will simply use this method in order to get some of the work automatically done for us.

Step 4
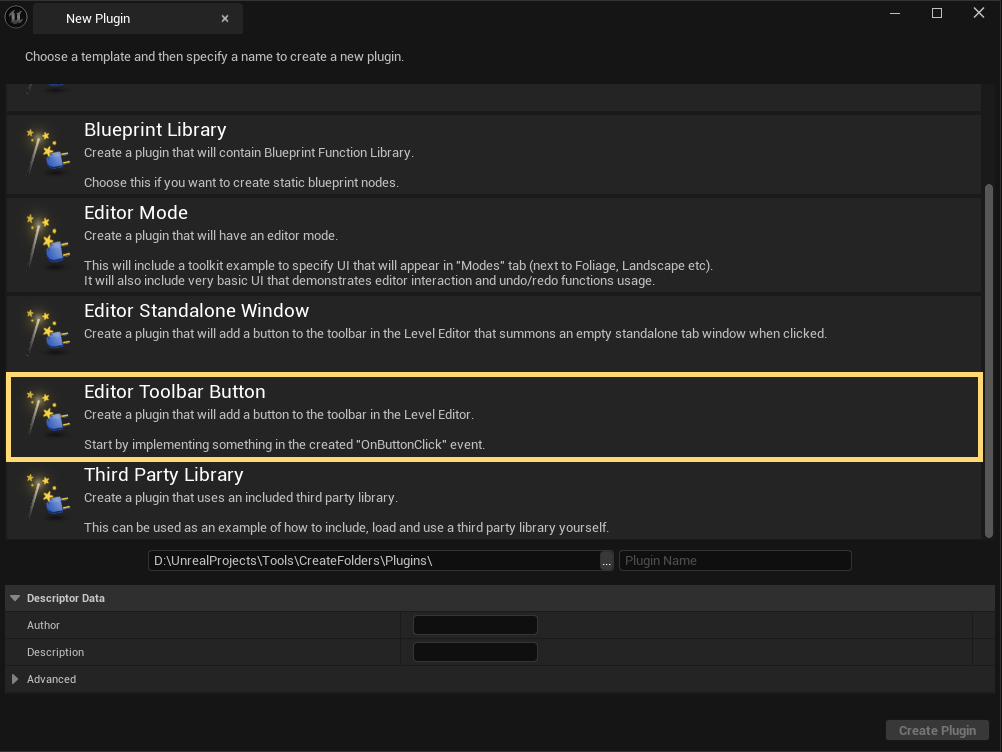
Scroll down the list of predefined plugin types until you see Editor Toolbar Button. This will create a pressable button along the top of the Editor UI and the template will already have code that will fire a function once pressed.
Give the plugin a name.
You can fill in the description details if you wish but these can be filled out at a later time.
Press the Create Plugin button. After a moment, switch to Visual Studio and accept the project update prompt.
Step 5
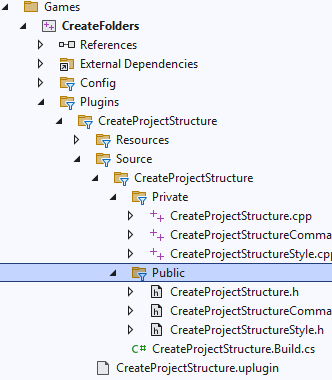
If you expand the project folder and drill down to the Plugins folder, you will see a structure related to the plugin you just created. These have all been autogenerated for us. Great!
In my case here – CreateFolders is my Unreal project name and CreateProjectStructure is my plugin name.
If it makes it easier, you can Right Mouse click on the CreateProjectStructure folder and select scope to this.
Step 6
If you switch back over to Unreal Engine, at the very bottom of the UI, there is the Live Build button, press this to compile your plugin as it is by default.
*Note* The live build icon will only be available in those projects that used C++ as the project value.
Once it completes, you will notice a dithered button along the top of the toolbar.

Step 7
Pressing this button will display a pop up dialog – cool, we can see things are actually functioning but it’s not doing anything custom so let’s see how we can change that.
We also want the user to be able to choose if they wish to run the custom code or not. We will take a look at all these things now.

Step 8
Back over in Visual Studio, if you open up the private .cpp file for our plugin, we will be able to confirm a few things. In my case, it’s called createFolderStructure.cpp.
If you scroll down the file, you will see a void F<PLUGINNAME>Module::PluginButtonClicked(). The PluginButtonClicked() is the function we want to focus on. The code will look similar to the image and we can see that it matches the information presented in the dialog box above.
What’s happening is that a FText string is being created, some values are being substituted in such as the file and module names, then finally the FMessageDialog box is opened with the dialog text being passed in.

Step 9
The first task is to see if we can change the dialog box from just having an OK button to having two…maybe an OK and a Cancel.
If we place the mouse over the Open in the FMessageDialog::Open(EAppMsgType::Ok, DialogText), more information will be presented.
We can see that EAppMsgType is being passed in and if we right click on this and select go to definition, we can see that we are currently passing in Ok as the type. Looking at the other options, YesNo will work for us as would OkCancel, but for now, we will go with YesNo.
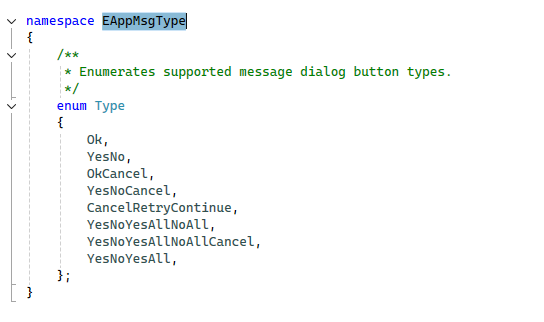
Step 10
Updating the code to use YesNo instead of Ok.

Step 11
Running live build again and pressing the button will now show the following:
Again, the text in mine might be a little different to yours but the key point is we now have a Yes No dialog window to work from! Let’s see first about changing the title of the pop up to something other than ‘Message’.

Step 12
Back in Visual Studio again, if you right click on Open again and do to definition, we can see the open dialog.
Right away, we are presented with the following comment visible to us:-
/** Pops up a message dialog box containing the input string.
 * @param Message Text of message to show
 * @param Title Optional title to use (defaults to "Message")
*/
Step 13
We can see it takes a FText object in as a title so lets update that!.
Back in your source cpp file, just above where the template declared the FText DialogText, type the following:-
const FText TitleText = FText::FromString(TEXT("Create Project Structure Tool"));We are creating a const FText object called TitleText using the FText object’s FromString’s method. Then providing text called Create Project Structure Tool. Since we didn’t need the FText::Format option presented in the template code, I was able to just type FText:: and visual studio showed all the other options I could use.

Step 14
We now need to pass this into the FMessageDialog::Open method. We can also update the text stored in DialogText at the same time. Switching back to Unreal and building will result in the following after pressing the button:
// Put your "OnButtonClicked" stuff here
const FText TitleText = FText::FromString(TEXT("Create Project Structure Tool"));
FText DialogText = FText::FromString(TEXT("Create Project Folder Structure?"));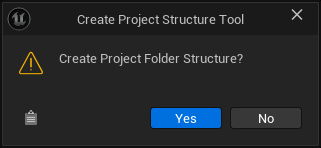
Step 15
Now we must find a way to do something if the user selects ‘Yes’ and likewise if they select ‘No’. We will do this by storing the entire message dialog line inside a variable. This way, we are able to see the returned result and deal with it via an if statement.
Change the FMessageDialog::Open(EAppMsgType::YesNo, DialogText, TitleText); to read as the code on the right hand side:
const EAppReturnType::Type Choice = FMessageDialog::Open(EAppMsgType::YesNo, DialogText, TitleText);
if (Choice == EAppReturnType::Yes)
{

}
else if (Choice == EAppReturnType::No)
{

}
Step 16
For now, we will simply log information to the console depending on which button is pressed. Once we see and confirm that working, we can add the code to create the folders.
If we search the UE C++ docs for ‘LOG’, it returns UE_LOG and provides examples. We will use this in our plugin.
Add these lines, just as the italic bold lines in the example to the right. We will use Warning just so it is easier to spot in the log.
Build and run the plugin in Unreal Editor.
const EAppReturnType::Type Choice = FMessageDialog::Open(EAppMsgType::YesNo, DialogText, TitleText);
if (Choice == EAppReturnType::Yes)
{
    UE_LOG(LogTemp, Warning, TEXT("Creating Folders"));
}
else if (Choice == EAppReturnType::No)
{
    UE_LOG(LogTemp, Warning, TEXT("Cancelling"));
}
Step 17
As you can see, our logic is working and depending on the selection, we get a different output to the log.

Step 18
Creating the folders: This will require a list of folder names that we want to plugin to automatically create for us. I find it best to use an array of type FString for this to store the TEXT() items.
Just above FText TextMessage = FText::FromString(“Create Project Structure Tool”); line, type the code shown:
Feel free to add or remove names as needed.
FString FolderNames[] = {
    TEXT("Animations"),
    TEXT("Blueprints"),
    TEXT("Images"),
    TEXT("Levels"),
    TEXT("Materials"),
    TEXT("Models"),
    TEXT("Sounds"),
    TEXT("Textures")
};
Step 19
If the user selected ‘Yes’, we need to then loop through the array and create a folder for each. We will first need to get the path to the current projects root. We can then append the Content folder to make a full path.
We need to use the PlatformFileManager so we can check if the folder exists etc. Again, these includes all come from searching the Unreal C++ docs. Add the following after the last #include at the top of the document:
Just after the FolderNames array, create the PlatformFile object:
#include "HAL/PlatformFilemanager.h"
#include "Misc/Paths.h"
IPlatformFile& PlatformFile = FPlatformFileManager::Get().
GetPlatformFile();Step 20
For each folder in FolderNames array, we need to create the full path that we want to create. We will need to create a for loop specifically for each folder name in FolderNames[].
This code will not do much at the moment, but essentially it will replace the variable FullPath on every loop with a complete file path of the project, content and each folder name in the array. Now we need to actually create the folders, but we need to check if they exist first…
for (const FString& FolderName : FolderNames)
{
	// Create an FString variable and store the project dir root, append Content to that, append the current Folder Name in the loop.
	FString FullPath = FPaths::ProjectDir() + TEXT("Content/") + FolderName;

}
Step 21
To check, after the FString FullPath variable, add the following:
if (!PlatformFile.DirectoryExists(*FullPath))
{

}
else
{

}
Step 22
To create a directory, we use PlatformFile.CreateDirectory() and pass in the FullPath:
We can do another check to see if the directory exists by using the code above again after creating the directory. If it does exist, log that it does, otherwise log that it failed. See the complete code at the bottom.
PlatformFile.CreateDirectory(*FullPath);PlatformFile.CreateDirectory(*FullPath);Step 23
Finally, let’s add an icon to the toolbar button. You can already test the plugin out and it should create the full list of folders you provide.
Go to the Plugins tab again, then:-
All Plugins > Project > Other
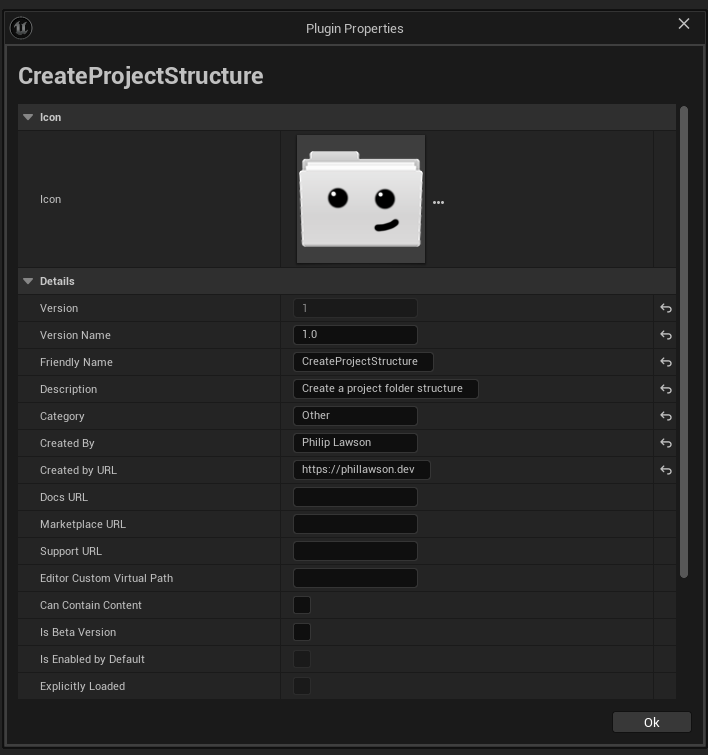
This is the default location of where the plugin is stored. Click on the plugin and then Edit. You can select the image you wish to use via the … and select a power of 2 PNG file of 128×128 size.
Step 24
You might notice that even though we’ve added the icon, it doesn’t appear in the toolbar. This is because we need to edit the styling file in our C++ project to point to use it. The current one will be visible in the plugins list however.
In Visual Studio, open the file CustomFolderStructureStyle.cpp or whatever you named your plugin.
If you expand the resources folder, you will see a png image has been added to the project called Icon128.png.

Step 25
With CustomFolderStructureStyle.cpp open, and search for the code mentioned here.
This wont work since we are using a PNG. Replace with with the second example. We also need another line to be added which is almost identical except a small change. Replace <PluginName> with whatever you called yours.
Style->Set(“<PluginName>.PluginAction”, new IMAGE_BRUSH_SVG(TEXT(“PlaceholderButtonIcon”), Icon20x20));
Style->Set("<PluginName>.PluginAction.Small", new IMAGE_BRUSH(TEXT("Icon128"), Icon20x20));

Style->Set("<PluginName>.PluginAction", new IMAGE_BRUSH(TEXT("Icon128"), Icon20x20));
return Style;
Step 26
Rebuild and run – enjoy your new plugin! You can use the package option under the Plugins tab if you need to export for use with other projects.

Final
void FCreateFolderStructureModule::PluginButtonClicked()
{
	// Put your "OnButtonClicked" stuff here
	FString FolderNames[] = {
	TEXT("Animations"),
	TEXT("Blueprints"),
	TEXT("Images"),
	TEXT("Levels"),
	TEXT("Materials"),
	TEXT("Models"),
	TEXT("Sounds"),
	TEXT("Textures")
	};

	// Get the platform file manager
	IPlatformFile& PlatformFile = FPlatformFileManager::Get().GetPlatformFile();

	const FText TitleText = FText::FromString(TEXT("Create Project Structure Tool"));
	FText DialogText = FText::FromString(TEXT("Create Project Folder Structure?"));
	const EAppReturnType::Type Choice = FMessageDialog::Open(EAppMsgType::YesNo, DialogText, TitleText);
	// If User selects Yes
	if (Choice == EAppReturnType::Yes)
	{
		// Write that we are creating folders to the log
		UE_LOG(LogTemp, Warning, TEXT("Creating Folders"));
		// For each folder name in the FolderNames array...
		for (const FString& FolderName : FolderNames)
		{
			// Create an FString variable and store the project dir root, append Content to that, append the current Folder Name in the loop.
			FString FullPath = FPaths::ProjectDir() + TEXT("Content/") + FolderName;

			if (!PlatformFile.DirectoryExists(*FullPath))
			{
				PlatformFile.CreateDirectory(*FullPath);

				if (!PlatformFile.DirectoryExists(*FullPath))
				{
					UE_LOG(LogTemp, Log, TEXT("Folder created successfully: %s"), *FullPath);
				}
				else
				{
					UE_LOG(LogTemp, Warning, TEXT("Failed to create folder: %s"), *FullPath);
				}
			}
			else
			{
				UE_LOG(LogTemp, Warning, TEXT("Folder already exists: %s"), *FullPath);
			}
		}
	}
	else if (Choice == EAppReturnType::No)
	{
		UE_LOG(LogTemp, Warning, TEXT("User selected 'No'"));
	}
}